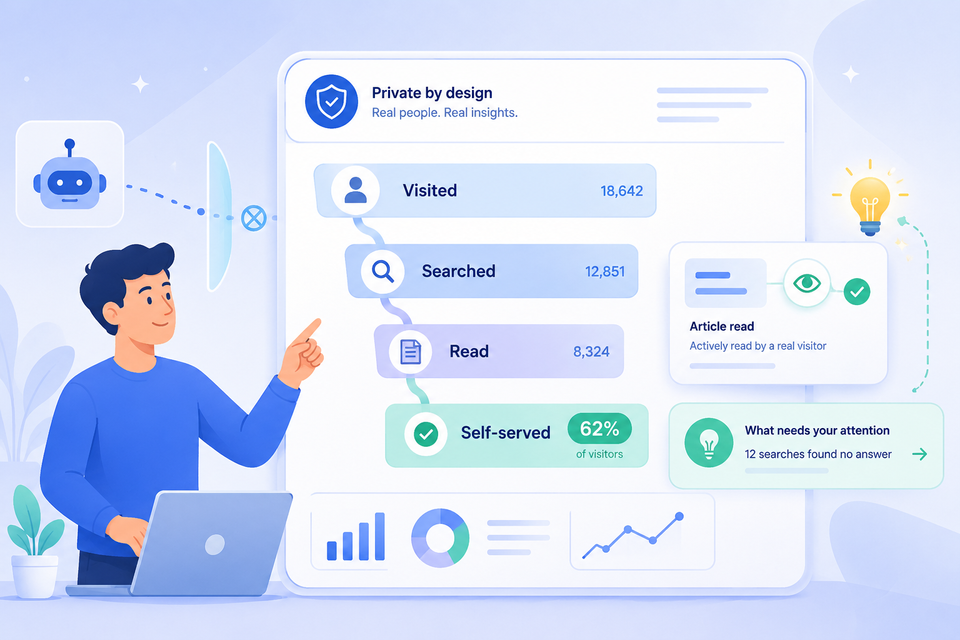
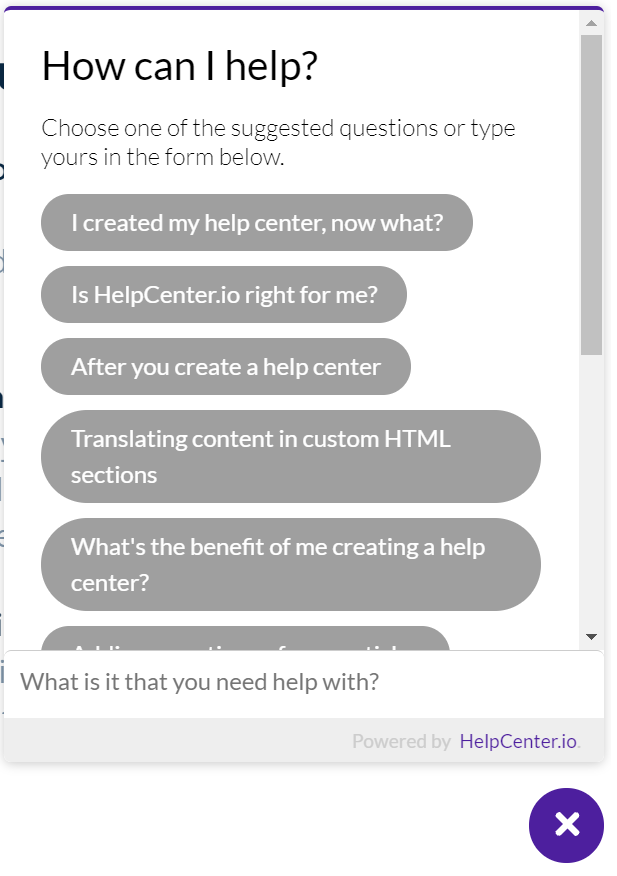
Sometimes all you need is NOT a chat bot. Meet our smart widget.

Chatbots often turn out ineffective and lead to more disappointed customers than satisfied ones. Why give computers human qualities for tasks they might not need such for? Is there a need for your customers to go through the whole human-like interaction just to get the information they need? The answer is - oftentimes not.
That is why we have decided to take on a different approach and smartly bring your knowledge base closer to all the people that need it the most at the time they need it the most. Suggesting relevant content from your help center, based on the context of your current user, turns out to be a lot more effective than letting people interact with a clunky chatbot that doesn't understand a thing most of the time. And this is what we did.
Meet our smart help center widget.
Our smart help center widget is always there, always ready to suggest support content from your knowledge base instead of waiting for your customers to reach out. This way, the knowledge base you've put so much time and effort into writing and polishing won't just lay there, never to be seen. Instead, it will serve its primary purpose. Less repetitive work for your customer support team and more satisfied customers.
Having the correct answers always available at the right time will delight your customer. They won't ever have to go through the trouble of writing to a chatbot to find themselves frustrated, unable to get the information they need, and eventually look for a human agent to help. Or, even worse, leave your website and look for another solution.
And suggesting relevant content is not everything that our JS widget does. You can embed and link help content directly into your website or web app and seamlessly guide your customers. Thus, your users won't ever have to switch contexts to learn how to get the best of your app and leverage all its nifty features.
You can have just a single article linked, so it pops up in a nice sidebar on your website when clicked, or you can have complete FAQ sections. Forget about the static FAQ content around your website that's so hard to maintain and meet our dynamic FAQ sections. You can learn more about these in the post below.
Still, there are times when your users might be unable to find help by themselves. For instance, your knowledge base could be missing something, or our algorithms might not have learned a specific case yet. For those times, our smart help center widget still allows your customers to reach out to your customer support team via different channels with initial support for email. You can also easily integrate our widget with any other ticketing or chat platform so that whenever clients cannot find something, they can quickly turn to your team.
Let us see how you can configure the widget for the first time and get the most out of it.
Configure the smart widget for your help center
Let's now go through the process of configuring the smart widget for your help center.
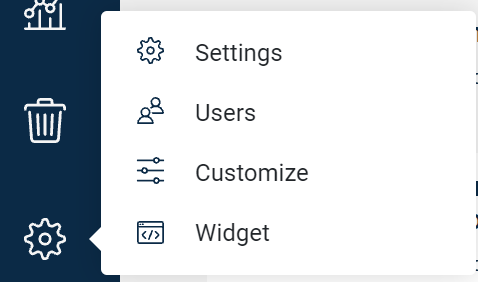
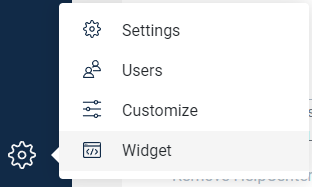
Click on the cog icon in the left-side menu of your help center dashboard, and you will find a new option at the bottom of the drop-right menu labeled "Widget".
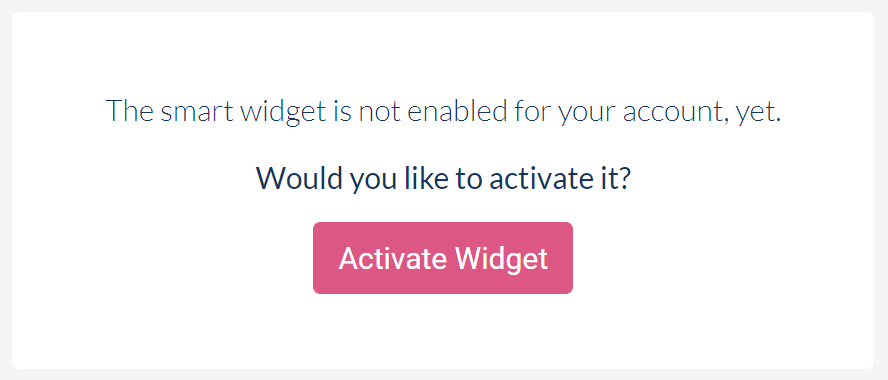
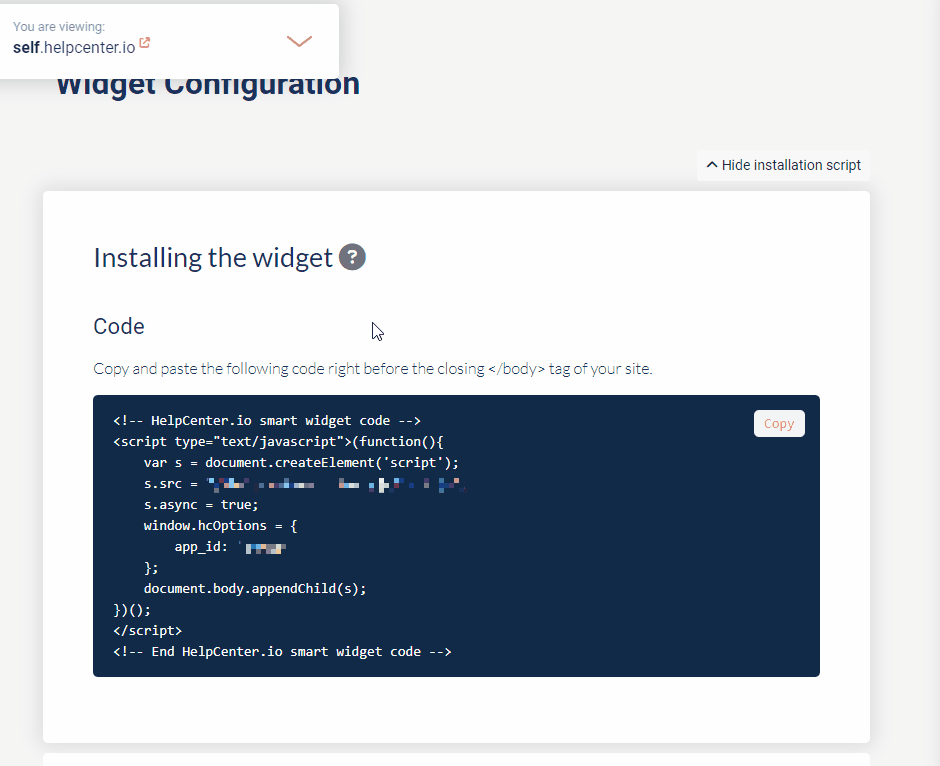
This option will lead you to the widget configuration page. When you open it for the first time, you will have to activate the widget for your help center. Click on the "Activate Widget" button to get started.
Once activated, on the same page, you will find the JS snippet you should use to install the widget on your website or your web app, together with some configuration options. Some options allow you to customize your widget to fit the style of the pages where you will place it. A live preview of every change you make is available alongside the configuration options.
You can customize the default texts in the widget or provide translations in your language.
When you set everything up, copy the JS snippet displayed at the top of the page and paste it right before the closing </body> tag of the pages where you want it to appear. If you are unsure how to do this, forward the JS snippet to your developers.
An important part is configuring the domain name of the page where you will place your widget. This is to prevent anybody else from using it. You can configure your site domain with the "Site URL" option in the widget configuration.

That's all about the setup.
What does the widget do on your website?
Once you install the widget, it can start taking some pressure off your support team.
Analyze and suggest
Every time a visitor lands on a page which has the HelpCenter.io widget in place, here is what happens. First, the widget reads the content of that page. Then it sends it to our servers for analysis and, as a result, gets back and presents relevant articles from your knowledge based on what the user is currently looking at. This way, if a user or a lead of yours is troubled by something and opens your widget to get help, they should find instant answers and solutions to all the topics you have already covered with your help content. Compare this to letting them dig through your whole help center (which could be overwhelming) or presenting them with a clunky chatbot (often similarly overwhelming).
Bringing your help center where your leads/users/customers might need it the most and giving them instant answers is what we are trying to achieve with the HelpCenter.io smart widget.
Open a specific category or article
When you want your widget to display something specific - e.g., the content of a particular category or a single article from your help center- you can configure the widget and use its API.
Here's what you could do with the smart widget JS API.
Link content from your help center
Last but not least, you won't have to get people to leave your website or app to open linked help articles. The risk with this is that sometimes they might not return. With the HelpCenter.io widget you can get your help center articles linked and displayed where your visitors are, so they don't have to navigate away to your help center.
Read more in our help article.
On top of that, if you don't need the help widget ribbon, you can always initialize in stealth mode. The widget will be invisible unless somebody clicks on a special link to your help center, which will make it display the requested help content in the widget sidebar.
A new kind of FAQ sections - Dynamic FAQ sections
Another great feature of the HelpCenter.io smart widget we are happy to announce is "Dynamic FAQ Sections".
Are you tired of creating and maintaining all those static, hard-to-maintain FAQ sections scattered all across your website and apps? Or you could be using several different tools for such a simple task. That's why we've added something special as a feature of the HelpCenter.io widget.
You might have wondered why our articles have the "Type" field with two options - "Article" and "FAQ". We first introduced improvements to how we displayed FAQs in your help center a while ago, so it all made more sense. But now, you can also organize all your FAQ items into sections and place them anywhere you have the HelpCenter.io widget installed.
Say goodbye to the static FAQ section and take control of all your help content from the same convenient HelpCenter.io dashboard you already use.
Let's go through a quick overview of what you can do with the dynamic FAQ sections.
Overview
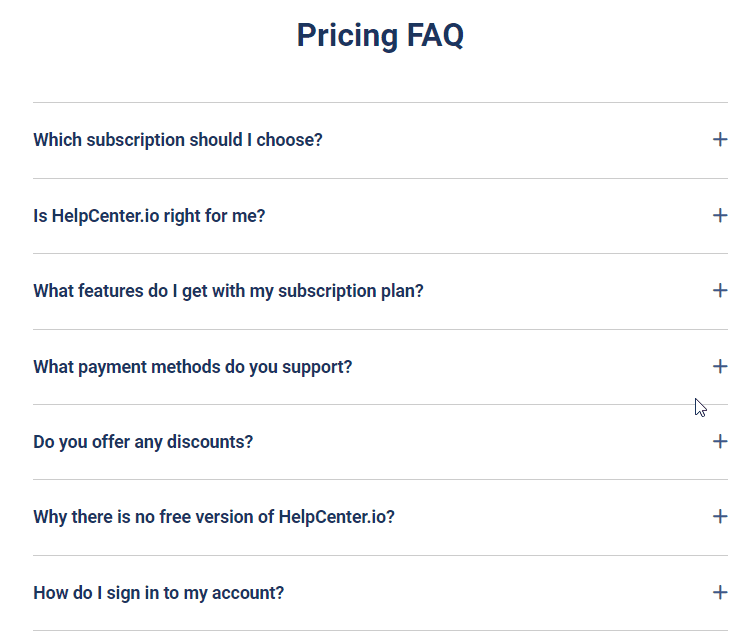
You can create two types of FAQ sections with HelpCenter.io and your help content.
"Full" will display all your help center FAQs arranged by category, while with "Include selected FAQs only" you could assemble various small FAQ sections to place anywhere you find convenient.
Creating an FAQ section
To create an FAQ section, navigate to the "Widget" page of your help center dashboard:
On the "Widget" page, scroll down, and near the end, you will find a section called "Your Dynamic FAQ Sections". There you could create and manage all your FAQ sections. Let us start by creating one. Click on the encircled plus icon next to the section title, and this will open up a modal where you can fill in some details about the FAQ section you are creating.
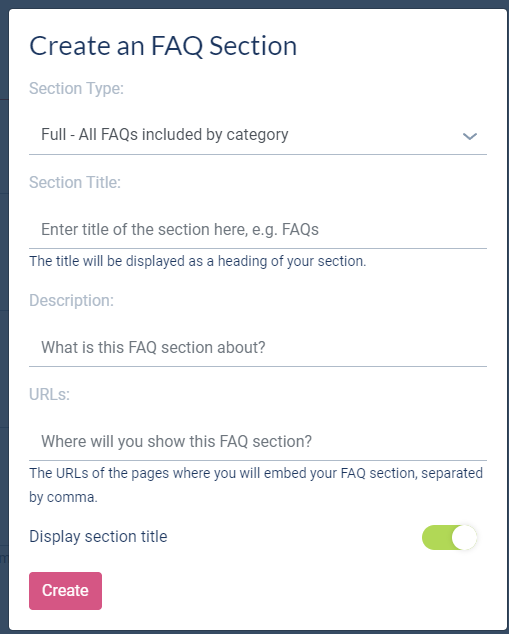
Select a type and enter a title as a start. Then click on the "Create" button to confirm. As I already mentioned, a "Full"-typed FAQ section will show all the FAQs you have in your help center, browsable by category, whereas with "Include only selected FAQs" you will have the choice of what should go into your FAQ section.
Since it is the more common case, we would now go with the second type - "Include only selected FAQs".
Once you press the "Create" button, your new dynamic FAQ section will appear in the list. Since we include only certain FAQ items from our help center, we must choose what will go in. Click on the "Manage FAQs" button, which will open up another modal window where you can select the FAQ-typed articles to display.

Make you selection and then close the modal. Everything you select/deselect is automatically saved.
Place FAQ sections on your website
Now that we have our FAQ section with some content, you can proceed and place it somewhere on your website. To do so, click the "Install" button to see the HTML snippet showing your dynamic FAQ section. Copy the sample code that would look like this:
<div class="hc-faq-section" data-id="12345" data-type="custom"></div>Place it where you would like this FAQ section to appear. And just like that, you are done.
Once you have your FAQ section rendered, you can use your custom CSS and JavaScript to style the different items and the content, make the items toggleable, or just about anything else you could imagine. We will take care of your content, and you can decide how you want to display it.
Make sure you have the JS widget also installed on the same page. You could have the JS widget installed in stealth mode if you want to use it only to display FAQ sections.
Place FAQ sections inside your other articles
FAQs arranged in sections could also become part of another longer explainer article in your help center to further clear things up. Use the Q&A option

from the side editor toolbar to select an FAQ section and render it inside your content.
Conclusion
I believe our smart widget, along with the FAQ sections, will make up for a better experience for all your customers, together with even less repetitive work for your customer support team. Dynamic FAQ sections could help you centralize all your help content in one place so the FAQ section, for example, won't ever get outdated and divert from the information in your help center. Thus, making for more consistent information that will not confuse your customers.
I can't wait to see how you will utilize all of this and what fantastic customer support experiences you will build.