Up next
The video did not load.
Lesson 10 of 13 · 0:33
Header links
From The Template Editor · Verified against the live product on Oct 20, 2026
This lesson
Add a link to your main website, then show it in the header with a Navigation component.
Prefer to read? Follow it step by step
Moments in this lesson
 Length 0:24
Up next · 0:24
11. Check every screen
Check the design on a phone and in dark mode before you publish.
Transcript
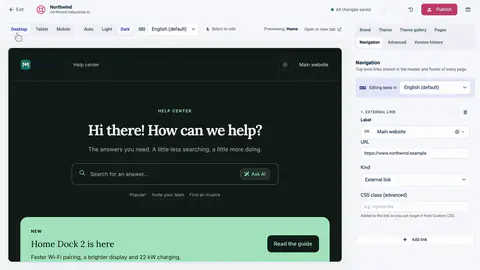
- 8:34Let's add a link to the header, back to our main website.
- 8:37In the Navigation tab, I'll click Add link.
- 8:41I'll call it Main website... paste in our website's address...
- 8:45and set the kind to External link.
- 8:48Links show up wherever there's a Navigation component...
- 8:51and our header doesn't have one yet.
- 8:53So in Pages, I'll open the header region... and add Navigation.
- 8:57And there it is, at the right of the header.
- 9:00Add the same component to the header of your other pages, and the link shows up there too.
Captions and this transcript come from the narration, word for word. Click any line to play from there.
About the course
Make your help center look exactly the way you want: themes, colors, pages, components and your own HTML.
What you'll learn
- Where the Template Editor is, and how the preview, settings and drafts work
- How to try a theme, keep what you like, and go back with Reset draft
- Brand, colors, fonts, spacing and corner radius
- The six page types, their layouts and regions, and how components fit together
- Select to edit: change text right in the preview
- Custom HTML, plus custom CSS that follows your theme's colors
- Header links, mobile and dark mode checks, publishing and version history
- Who it's for
- Anyone who owns the look of a help center, from a first-day trial to a redesign.
- Format
- 13 lessons, 10:35 in all. English captions and a full transcript.
- Last verified
- Oct 20, 2026, on the live product with the Northwind demo help center
- Plans
- Everything in this course works on every plan.
Articles
Every lesson pairs with a help article, so you can read the steps at your own pace.
-
Get started with the template editor self.helpcenter.io/content/template-editorGoes with these lessons
-
Choose a theme self.helpcenter.io/content/choose-a-themeGoes with
-
Which theme is right for you? self.helpcenter.io/content/theme-galleryGoes with
-
Add your logo, favicon and brand name self.helpcenter.io/content/logo-and-brandGoes with
-
Change colors, fonts and spacing self.helpcenter.io/content/colors-and-fontsGoes with
-
Pages, regions and shared headers explained self.helpcenter.io/content/pages-and-regionsGoes with
-
Add, move and remove components self.helpcenter.io/content/componentsGoes with
-
Edit text right in the preview self.helpcenter.io/content/edit-in-previewGoes with
-
Customize the article page self.helpcenter.io/content/article-pageGoes with
-
Add custom CSS self.helpcenter.io/content/custom-cssGoes with
-
Custom CSS reference: selectors and examples self.helpcenter.io/content/custom-css-referenceGoes with
-
Add links to your header and footer self.helpcenter.io/content/navigation-linksGoes with
-
Customize the header and footer self.helpcenter.io/content/header-and-footerGoes with
-
Preview on phones, tablets and in dark mode self.helpcenter.io/content/preview-your-designGoes with
-
Light and dark mode self.helpcenter.io/content/dark-modeGoes with
-
Publish your design self.helpcenter.io/content/publish-your-designGoes with
-
Restore an earlier design self.helpcenter.io/content/restore-a-designGoes with