Up next
The video did not load.
Video course · 5 lessons · 5:28
Set up a help center from scratch
From Set up a help center from scratch · Verified against the live product on Nov 10, 2026
This lesson
From nothing at all to a help center your customers can read, in three steps, for Pebble, a budgeting app.
Prefer to read? Follow it step by step
Moments in this lesson
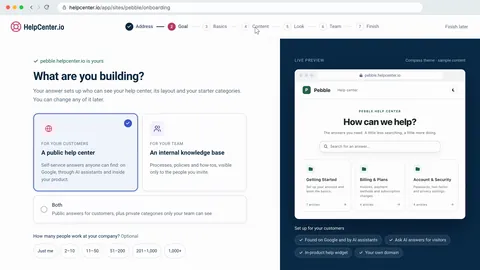 Length 1:53
Up next · 1:53
2. Create your account and name your help center
Sign up with no credit card, keep or change the suggested address, and answer a short setup. Your dashboard opens with a checklist for the rest.
Transcript
Lesson 1 · Introduction
- 0:05Hi!
- 0:06In this video, I'll show you how to set up a help center from scratch... and have it live for your customers by the end.
- 0:13First, we'll create an account and name the help center... Then we'll write and publish a first article... And finally, we'll publish the help center itself, so anyone can read it.
- 0:24We'll do it for Pebble, a budgeting app, starting from nothing at all.
Lesson 2 · Create your account and name your help center
- 0:30Everything starts at helpcenter dot io slash app slash signup.
- 0:35Your fourteen-day free trial starts here, and you don't need a credit card.
- 0:40You can sign up with Google... or with your email, as I'll do here.
- 0:43Enter your Work email... then Your name.
- 0:47It's shown as the author on the articles you publish... and a Password, of at least eight characters.
- 0:52Tick I agree to the Terms of Service... and click Create my account.
- 0:57Next, choose your help center's address.
- 0:59It's suggested from your work email: pebble dot helpcenter dot io.
- 1:04Keep it, or make it your own.
- 1:05You can rename it later, or connect your own domain.
- 1:09Click Create my help center.
- 1:11A short setup follows.
- 1:12It takes about three minutes, and you can skip any step.
- 1:15First: What are you building?
- 1:17Pebble's is for its customers, a public help center... so I'll click Continue.
- 1:22Name your help center.
- 1:24Pebble is already filled in... and it's shown in the header, the browser tab and search results.
- 1:31If you're moving from another tool, paste its address here... or connect Notion, or upload files.
- 1:37We're starting from nothing, so choose Start fresh... six starter categories, ready to fill in.
- 1:43Pick a starting look.
- 1:44Compass is recommended... and you can switch templates, or fine-tune colors and fonts, in the Template editor later.
- 1:53You can invite your team now... or skip this step and do it later, from Settings.
- 1:59And Pebble is set up.
- 2:04Pebble is ready.
- 2:05Only your team can see it while you get it ready... and we'll publish it at the end of this video.
- 2:10Click Go to my dashboard.
- 2:12Your dashboard opens on Articles, with a checklist: Get Pebble live.
- 2:17It shows what's left to do... and we'll follow it the rest of the way.
Lesson 3 · Write and publish your first article
- 2:23Next on the checklist is your first article.
- 2:26Click New article.
- 2:27Give it a title your customers would search for: Reset your password.
- 2:32Then click below the title, and start writing.
- 2:37For lists, headings and images, type a slash on an empty line... and choose Numbered list.
- 2:43Steps work best as a numbered list: one action each, with every button named exactly as it appears on screen.
- 2:51A heading splits the article into sections.
- 2:53Slash, Heading two... Didn't get the email?
- 2:59And a screenshot helps where a step is hard to picture.
- 3:02Slash, Image... and pick the file.
- 3:06Now choose where it belongs.
- 3:08Click the category under the title, Uncategorized... and pick Account and security.
- 3:13Until you save it, a new article lives only in this browser.
- 3:17Click Save draft... and it's in your library, where your team can find it.
- 3:21Readers can't see it yet.
- 3:23When it's ready, click Publish... and it shows up in its category, and in search.
- 3:28Let's take a look.
- 3:29Back on Articles, click View help center.
- 3:32There's Pebble's help center... and your article, under Account and security.
- 3:36But see the bar at the top: Not published yet.
- 3:39Only your team can see this help center... so that's next.
Lesson 4 · Publish your help center
- 3:46Here's what a customer sees right now, signed out: This help center isn't published yet.
- 3:51To publish it, open Settings.
- 3:54The Publishing card is at the top... and Publish help center is locked.
- 3:58Two things come first.
- 4:00First, confirm your email address.
- 4:03Open the email we sent when you signed up... and click Verify Email Address... Your email is verified.
- 4:09Back in Settings, the card now says Publish when you activate your plan.
- 4:14Publishing is available once your plan is activated... and activating keeps your free trial, so you won't be charged until it ends.
- 4:21Click Activate your plan.
- 4:23Your plan is on the left, with Change to pick another.
- 4:26Fill in your billing details... add a card... and click Activate.
- 4:35Back in Settings, Publish help center is unlocked.
- 4:38Click it... and confirm with Publish... Your help center is published.
- 4:42Anyone can read it now.
- 4:44Let's check it the way a customer would, signed out.
- 4:47Reload the page... and there's Pebble's help center, with your article.
- 4:53Only published articles show.
- 4:55The sample article in Getting started is still a draft... so readers don't see it.
Lesson 5 · Wrap-up
Captions and this transcript come from the narration, word for word. Click any line to play from there.
About the course
From a new account to a help center anyone can read: sign up, write and publish your first article, then publish your help center.
What you'll learn
- Signing up with no credit card and choosing your help center's address
- The short setup: what you're building, its name, starter categories and a starting look
- Writing an article with steps, a heading and a screenshot, and choosing its category
- Saving a draft, publishing it, and seeing your help center the way your team sees it
- Confirming your email, activating your plan and publishing your help center
- Checking it signed out, the way a customer sees it
- Who it's for
- Anyone starting a help center on HelpCenter.io, from the signup page to a help center customers can read.
- Format
- 5 lessons, 5:28 in all. English captions and a full transcript.
- Last verified
- Nov 10, 2026, on the live product with the Northwind demo help center
- Plans
- Everything in this course works on every plan.
Articles
Every lesson pairs with a help article, so you can read the steps at your own pace.
-
Set up your help center: a first-hour checklist self.helpcenter.io/content/set-up-your-help-centerGoes with these lessons
-
Create your HelpCenter.io account self.helpcenter.io/content/create-your-account
-
Write and publish your first article self.helpcenter.io/content/write-your-first-articleGoes with
-
Publish your help center self.helpcenter.io/content/make-your-help-center-publicGoes with