Up next
The video did not load.
Video course · 13 lessons · 10:35
The Template Editor
From The Template Editor · Verified against the live product on Oct 20, 2026
This lesson
What the course covers, and the Northwind demo help center we use the whole way through.
Prefer to read? Follow it step by step
Moments in this lesson
 Length 1:02
Up next · 1:02
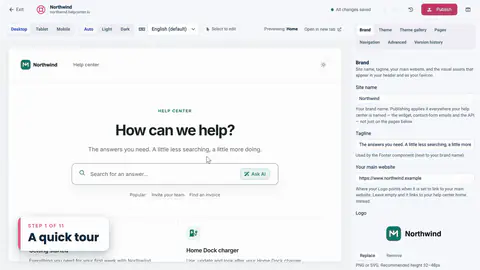
2. A quick tour
The live preview on the left, the settings on the right, and what each tab is for.
Transcript
Lesson 1 · Introduction
- 0:05Hi!
- 0:06In this video, I'll walk you through the Template Editor in HelpCenter.io...
- 0:11the place where you decide how your help center looks.
- 0:14We'll start with the basics, like themes, colors and fonts.
- 0:18Then we'll look at how pages and components fit together.
- 0:21And at the end, I'll show you how to build a component of your own, with a little HTML.
- 0:26I'm signed in to Northwind, a demo help center we'll use the whole way through.
- 0:31To open the editor, I'll go to the menu on the left... and click Template editor.
Lesson 2 · A quick tour
- 0:41This is the Template Editor.
- 0:43It has two halves.
- 0:44On the left, a live preview of your help center...
- 0:47and on the right, all of the settings.
- 0:50The preview isn't a mockup.
- 0:52It's your real help center, with your real categories and articles...
- 0:56and every change you make shows up here right away.
- 1:01The settings are grouped into tabs.
- 1:03Brand... Theme... Theme gallery... Pages... Navigation... Advanced... and Version history.
- 1:10We'll go through the important ones together.
- 1:13Above the preview, you can switch between desktop, tablet and mobile sizes...
- 1:17check light and dark mode... and turn on Select to edit, which we'll try in a few minutes.
- 1:23Up here, the editor saves your work automatically.
- 1:26And this is the most important thing to know:
- 1:29everything you change is saved as a draft.
- 1:32Your visitors won't see any of it... until you click Publish.
- 1:36And if you ever make a mistake, Undo and Redo are right beside it.
Lesson 3 · Start from a theme
- 1:43The quickest way to change the whole look is to start from a theme.
- 1:47I'll open the Theme gallery.
- 1:49Northwind uses Compass, the theme marked active.
- 1:52Below it, there are more to choose from... some built for documentation, some for support teams, and a few made for specific industries.
- 2:07Let's try Aurora Support.
- 2:09I'll click Compare and apply.
- 2:12Before anything changes, the editor asks which parts of the theme you want.
- 2:16Brand is unticked, so your logo and name stay exactly as they are...
- 2:20and you can untick anything else you'd like to keep, too.
- 2:24I'll click Apply theme.
- 2:26And there it is.
- 2:28A completely different look... with the same content.
- 2:31And remember, it's still only a draft.
- 2:34I'd like to stay with Compass for this video.
- 2:37Undo can't take back a whole theme...
- 2:39but nothing here is published yet, so I'll click Reset draft.
- 2:43It throws away every unpublished change... and we're right back with Compass.
Lesson 4 · Your brand
- 2:50Next, the Brand tab.
- 2:52This is where your help center's identity lives.
- 2:55Here's the site name and the tagline that appear around your help center.
- 2:59Further down, you can upload your logo... a lighter version for dark mode...
- 3:04and the small favicon that shows up in browser tabs.
- 3:07And below that are your search settings:
- 3:09the page title and description that people see in Google results.
Lesson 5 · Colors, fonts and spacing
- 3:15Now for the fun part.
- 3:17The Theme tab holds the design settings for your whole help center: colors, fonts and spacing.
- 3:24The primary color is used for links, buttons and highlights.
- 3:27I'll click on it... and type in a new one.
- 3:30A deep blue.
- 3:31Watch the preview.
- 3:33Every highlight picks up the new color straight away.
- 3:36The other colors set the text, the page background, the surfaces of cards and panels... and the borders.
- 3:43There's a separate set for dark mode, so both look right.
- 3:46Let's scroll down to the fonts.
- 3:48I'll give the headings a different typeface... let's try Lora, a classic serif.
- 3:53Density controls how much breathing room everything gets.
- 3:57I'll make it a little more spacious.
- 4:01And the corner radius rounds off cards, buttons and the search bar.
Lesson 6 · Pages, regions and components
- 4:11Next, let's look at how your help center is put together.
- 4:14I'll open the Pages tab.
- 4:16Your help center has six kinds of pages:
- 4:19the home page, category pages, article pages, search results, the contact page...
- 4:25and the page people see when something can't be found.
- 4:28I choose which one to edit right here.
- 4:30Each page has a layout.
- 4:32A single column... or with a sidebar, a rail, or a docked sidebar.
- 4:37Every page is divided into regions.
- 4:40The header at the top... the hero... an optional sidebar...
- 4:44the main content... the footer... and a utility region for extras.
- 4:48The numbers show how many components each region holds.
- 4:52And inside every region are components... the building blocks of your pages.
- 4:57The main region of the home page holds a category grid... and an article list.
- 5:01Click a component to open its settings.
- 5:04Let's open the category grid.
- 5:06I can change how the categories are laid out.
- 5:08Vertical cards... horizontal cards... or a simple list.
- 5:12I'll go with horizontal.
- 5:14And I can choose what each card shows.
- 5:16I'll add a link to browse the whole category.
- 5:19To get back to the list, I'll click Main, up here.
- 5:23Now let's add something new.
- 5:24I'll click Add component.
- 5:26Here's everything you can add, grouped by what it does: layout pieces, ways to show your categories and articles... forms, and blocks for your own content.
- 5:36I'll search for FAQs... and add it.
- 5:40New components land at the end of the region.
- 5:43I'll go back to the list... and move it up with the arrow.
- 5:46You can also drag a component by its handle.
- 5:49Some components can hold others.
- 5:51The hero, for example, holds a small label, the search bar, and a row of popular links... so they move and style together, as one block.
- 6:00And if you want a region to look the same on every page, like the header, you can apply it to other pages... and keep them in sync.
Lesson 7 · Edit right in the preview
- 6:09There's an even faster way to make changes.
- 6:12I'll click Select to edit.
- 6:14Now I can click any text in the preview... and simply type over it.
- 6:18Let's change the main headline.
- 6:22I'll press Enter to keep it.
- 6:24And when I click anything else, like the search bar, its settings open on the right, ready to change.
Lesson 8 · The article page
- 6:34Let's switch to the article page.
- 6:36This is what readers see when they open one of your articles.
- 6:41The main region holds the article itself... and the regions around it hold helpful extras, like the browse menu, and a table of contents.
- 6:49I'd like readers to tell us whether an article helped them.
- 6:52So in the main region, I'll add Was this helpful?
- 6:56And there it is, at the end of the article.
Lesson 9 · Your own component with HTML
- 7:02Now for something a bit more advanced.
- 7:05Sometimes you'll want something that isn't in the list...
- 7:08like a banner for a new product.
- 7:10That's what the Custom HTML component is for.
- 7:13I'll go back to the home page, open the main region... and add Custom HTML.
- 7:19This gives me a code editor.
- 7:21I'll paste in a small piece of HTML I prepared earlier:
- 7:24a label, a heading, a short sentence, and a link.
- 7:28It's plain HTML.
- 7:30The class names are just names I made up... so that I can style them in a moment.
- 7:34I'll move it to the top of the region... and scroll down in the preview.
- 7:38There it is... though it doesn't look like much yet.
- 7:42To style it, I'll open the Advanced tab, and add a custom CSS snippet.
- 7:48I'll name it Product banner, so the rest of the team knows what it's for... and paste in the styles.
- 7:53Notice that instead of fixed colors, these styles use the theme's own color variables.
- 7:59That way, the banner always matches your theme.
- 8:02I'll click Save... and now the banner looks the part.
- 8:05Here's why those variables matter.
- 8:07If I change the primary color in the Theme tab... the banner follows right along.
- 8:12I'll undo that, because I like the blue.
- 8:15Two things to keep in mind.
- 8:17Scripts don't run inside Custom HTML... if you need analytics or a chat widget, add them here, under script injections.
- 8:25And your custom CSS only ever applies inside your help center... so it can't affect anything else.
Lesson 10 · Header links
- 8:34Let's add a link to the header, back to our main website.
- 8:37In the Navigation tab, I'll click Add link.
- 8:41I'll call it Main website... paste in our website's address...
- 8:45and set the kind to External link.
- 8:48Links show up wherever there's a Navigation component...
- 8:51and our header doesn't have one yet.
- 8:53So in Pages, I'll open the header region... and add Navigation.
- 8:57And there it is, at the right of the header.
- 9:00Add the same component to the header of your other pages, and the link shows up there too.
Lesson 11 · Check every screen
Lesson 12 · Publish and version history
- 9:32I'm happy with all of this, so I'll click Publish.
- 9:35The editor lists what changed, and I can leave a short note for my team.
- 9:41I'll click Publish... and my live help center is updated.
- 9:45Every publish saves a restore point in Version history.
- 9:49To bring back an earlier design, just click Restore next to it.
- 9:53And here's our live help center... with the new colors, fonts, banner and all.
Lesson 13 · Wrapping up
- 10:04And that's the Template Editor.
- 10:06We picked a theme, set the brand, colors and fonts...
- 10:09worked with pages, regions and components...
- 10:12edited right in the preview... and built a component of our own, with HTML and CSS.
- 10:23Thanks for watching... and have fun making your help center your own.
Captions and this transcript come from the narration, word for word. Click any line to play from there.
About the course
Make your help center look exactly the way you want: themes, colors, pages, components and your own HTML.
What you'll learn
- Where the Template Editor is, and how the preview, settings and drafts work
- How to try a theme, keep what you like, and go back with Reset draft
- Brand, colors, fonts, spacing and corner radius
- The six page types, their layouts and regions, and how components fit together
- Select to edit: change text right in the preview
- Custom HTML, plus custom CSS that follows your theme's colors
- Header links, mobile and dark mode checks, publishing and version history
- Who it's for
- Anyone who owns the look of a help center, from a first-day trial to a redesign.
- Format
- 13 lessons, 10:35 in all. English captions and a full transcript.
- Last verified
- Oct 20, 2026, on the live product with the Northwind demo help center
- Plans
- Everything in this course works on every plan.
Articles
Every lesson pairs with a help article, so you can read the steps at your own pace.
-
Get started with the template editor self.helpcenter.io/content/template-editorGoes with these lessons
-
Choose a theme self.helpcenter.io/content/choose-a-themeGoes with
-
Which theme is right for you? self.helpcenter.io/content/theme-galleryGoes with
-
Add your logo, favicon and brand name self.helpcenter.io/content/logo-and-brandGoes with
-
Change colors, fonts and spacing self.helpcenter.io/content/colors-and-fontsGoes with
-
Pages, regions and shared headers explained self.helpcenter.io/content/pages-and-regionsGoes with
-
Add, move and remove components self.helpcenter.io/content/componentsGoes with
-
Edit text right in the preview self.helpcenter.io/content/edit-in-previewGoes with
-
Customize the article page self.helpcenter.io/content/article-pageGoes with
-
Add custom CSS self.helpcenter.io/content/custom-cssGoes with
-
Custom CSS reference: selectors and examples self.helpcenter.io/content/custom-css-referenceGoes with
-
Add links to your header and footer self.helpcenter.io/content/navigation-linksGoes with
-
Customize the header and footer self.helpcenter.io/content/header-and-footerGoes with
-
Preview on phones, tablets and in dark mode self.helpcenter.io/content/preview-your-designGoes with
-
Light and dark mode self.helpcenter.io/content/dark-modeGoes with
-
Publish your design self.helpcenter.io/content/publish-your-designGoes with
-
Restore an earlier design self.helpcenter.io/content/restore-a-designGoes with